Rebuilding and Repairing The Quadra-Jet
Quality Quadrajets –
“Quadrbog” “Quadraslob” “Quadraslow”, all these names have been given to GM’s high-performance carburetors over the years, but most were applied by people who had no idea what made them work – and no idea how to make them perform.
The surprise is that a properly operating Quadrajet will perform with the best Holley and AFB AND it won’t leak all over the place AND it will give an outstanding low-speed performance for big-cammed cars!
Surprised? Don’t be. Rochester spent millions of dollars on research and development to come up with a carb that would literally outperform the triple 2-barrel systems – and they succeeded! However, over the years, the tricks to make them perform and the ways to repair them have been lost. We are here to tell you that we have the means to bring them back to life and we’ll be covering them here.
In Part One we will tell you how to rehab a Quadra-Jet AND in Part Two we’ll show you how to tune one for maximum performance. Please don’t skip Part One, because 90% of those Q-jets out there, even the rebuilt ones, NEED WORK.
Please consider getting the Doug Roe reference book shown at the right before you start as this article is an overview/guide.
Part One – How to Rehab Your Q-jet
First, get it out of your head that you are going to buy a gasket set and fix all the ills of your Q-jet. A simple rebuilding kit is an OK investment, but it is not going to turn your 40-year-old carb into a performance king. In fact, that kit make results in less or no performance improvement!
Like most mechanical devices, the Q-jet is subject to wear and component breakdown over the years. Let’s quickly discuss what is likely to be wrong with your Q-Jet:
- Vacuum leaks in the bowl’s bottom well plugs
- Worn primary and secondary throttle shafts (primary ids usually worse)
- Bent throttle shafts or misaligned throttle plates
- Warped base plate
- Bad float and/or
- Clogged in-carb fuel filter
We will address these issues in this segment as we go through the rebuild. There are other adjustments and parts that should be replaced or modified for maximum performance which we will discuss in Part Two.
In order to make the carb work and look like new, you are going to need to buy some components. Edelbrock has a host of new parts you will need in this segment and for Part Two. Eastwood’s Carb Renew is nothing more than the correct color lacquer paint for the outside, but it will really make your carb look dandy after you spent all that time on it – what the heck, right?
The items you will need right now are the Needle and Seat Assembly #1980 and Float Assembly #1985 (1974 & earlier) or 1984 (1975 or later).
Completely disassemble your Q-jet following the Chassis Service or Quadrajet Service manual. Once disassembled, all parts are cleaned in carb cleaner (we suggest the “dip it” system). But before you do that, first check to see if the base plate is warped using a quality steel straight edge. Check on both sides! If it is warped, don’t think a thick gasket will fix it because it will likely mean your throttle shafts will stick. If it’s warped, it’s junk.
If your base is not straight, we suggest you search for and use the proper year Oldsmobile carb (not necessarily the exact model) carb and find one that is not warped, because many different year bases are different and the Divisions used different bases as well.
Just because your base plate is not warped does not mean it’s OK. The next check is for loose/warped throttle shafts. If there is any slop in the shaft, it is likely no good. Frankly, ASSUME it is not good and go through this step with the primary throttle plate at least. Even if the shaft is not sloppy, check to see if it is bent (you can actually bend the shafts by too much WOT). Do this by making sure they travel through their full arc without sticking. The shafts should open to 90 degrees (fully vertical) to the base.
If the shaft or shafts are sloppy there is a kit to allow a bushing to be installed and we recommend you purchase it. (Tomco and The Carb Shop sell this kit. When you are finished, the shaft should turn smoothly but not wobble in the base. If the shaft is bent – it’s back to the junkyard, as it is almost impossible to straighten this piece.
When removing the throttle plates to remove the shaft, you will notice there is a play built into the plate screw holes to allow alignment in the base plate bore. When you reassemble the shaft/plates, make sure they are properly aligned before fully tightening the screws (use Loctite and don’t over-tighten).
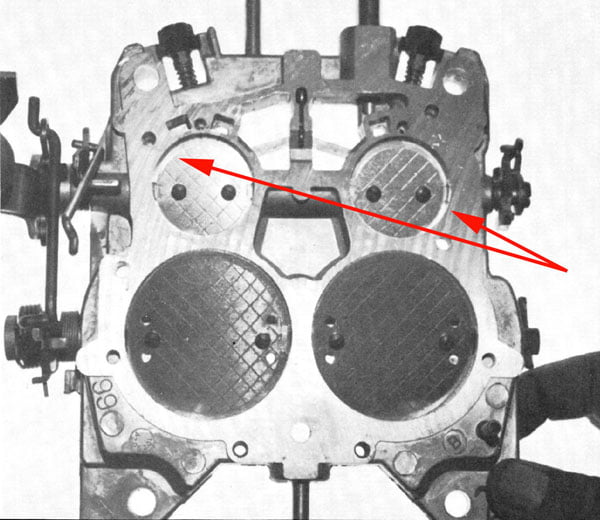
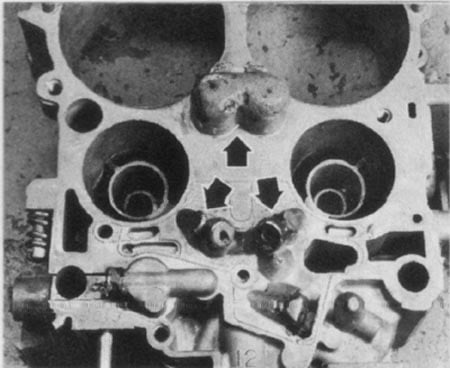
Once you are finished with the base, it is now time to repair the bowl assembly. Like the base, there are two repairs that should be made regardless of the age or condition of the carb. When you turn the float bowl over, you will see the primary and secondary casting fuel well plugs stick up. (See picture at right). They always leak.
There is a kit to drill out the pressed-in secondary plugs and replace them with self-tapping plugs, but I have known them to leak too. I suggest that you seal all 4 of the wells with epoxy, and don’t install the plugs because the plugs will require epoxy as well and you can ruin the float bowl with overzealous drilling.
While the bowl is drying, pick up the float bowl cover, turn it over, and gently tap the vertical brass feed tubes with a plastic hammer to ensure they are fully seated, as they have a tendency to work free over time. Check to make sure that the top is not appreciably warped as well (some small amount of warping here is OK unless it affects the movement of the Secondary Air Valve (flap).
Check the Secondary Air Valve to make sure it does not bind. Do not loosen the secondary air valve spring at this time as you can damage it. There should be enough tension in the spring to allow you to push open the flap and let it snap closed. Like the throttle plates, make sure the air valve plates are properly aligned and if they are not, gently loosen the attachment screws and align them (use Loctite on the screws as before).
Check the secondary metering rod hanger and ensure that it is not bent. The rods should hang evenly on each side, and the hanger arms should be vertical and not bent perpendicular. Each carb has a hangar size set specifically for that carb, (it has a letter on it) so do not switch this out from another carb at this time if it is bent – we will discuss what to do in Part Two.
Now it’s time to go back to the bowl. Use ultrafine (1000 grit) emery paper to clean out the accelerator pump and power piston bores. Obviously, make sure that there is no residue in these bores when you are done. If the power piston is scored from debris in the bore, it will have to be replaced. The needle and seat of a standard Q-jet are not capable of handling increased flow, so use the one in the Edelbrock #1980 high-flow unit.
1966 and early 1967 carbs come with a fuel inlet diaphragm in place of a needle and seat. They can be converted to a needle and seat, but the change doesn’t always work out well due to how the carb was originally calibrated. If your carb came with this setup and you cannot find a diaphragm and you want to keep the carb for authenticity, contact The Carburetor Shop.
Throw away your old float and use Edelbrock’s #1984 or 1985 as appropriate. You are now ready to reassemble the carburetor. BUT WAIT!
Unlike a Holley or other carbs, we must make changes to increase performance before we assemble the carb. A Q-jet has a lot of places where you can tune it – and this is the boon and bane of the carb. We suggest you increase the jet size by 2 points over stock (as shown in the Manual). For now, leave all else stock.
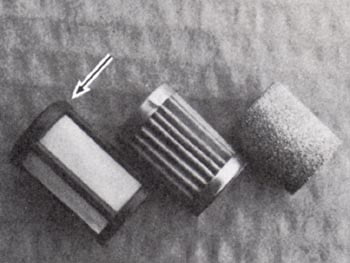
Aside from the needle and seat, you should replace the paper or bronze fuel filter. Use Marine filter #7029038 in place of these filters. This nylon filter is available through Mercury Marine dealers as P/N 35-53336Q. It is a low-restriction nylon mesh that is 11/16″ in diameter and 1 1/8″ long (see picture at right). You may also use Edelbrock’s 1926 or 1927 filter (based on inlet size).
Those of you with 1972 and later carb cannot run the Marine filter without replacing the nut with TOMCO nut, PN 491 as your filter nut size is 1″. The PN 491 is self-tapping. (www.tomco-inc.com). You may also be able to find a brass reducer in a parts store, bring the old nut for fitment comparison.


Quadra-jet Exploded view with parts named
Click on the images below to enlarge them

Rochester 4M Quadra-Jet Image 1
A typical Quadra-Jet
Rochester 4M Quadra-Jet Image 3
This is a picture of a Q-J base plase with severe throttle plate mis-alignment. Make sure you line ’em up properly when you reinstall.
Rochester 4M Quadra-Jet Image 4
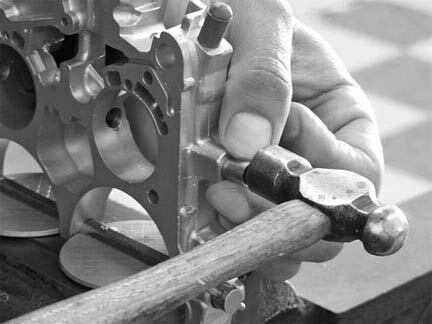
After drilling out the throttle shaft for the bushings, carefully tap them into place.
Rochester 4M Quadra-Jet Image 5
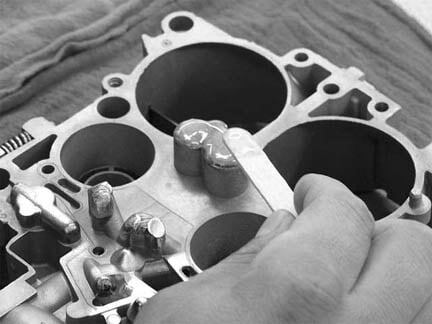
Apply Epoxy to the wells. Be generous and make sure the plug seams are covered.
Rochester 4M Quadra-Jet Image 6
Liberally coat the wells with epoxy as shown.

Rochester 4M Quadra-Jet Image 7
Don’t put these pieces in the carb cleaner as you will destroy them!
Rochester 4M Quadra-Jet Image 8
Use this nylon filter rather than paper or bronze. It flows more fuel.